Windows Update is an important built-in online tool
that ensures your system gets all the latest software additions and bug
fixes. Unlike the Windows Update version in Windows XP, Windows 7
supplies users an integrated update system that does not require the
user to go to the Microsoft update website. Instead of opening a web
browser, the new version of Windows Update opens in the same existing
window.
Windows Update has been made to be seamless to
its users. Let’s say a newly installed update requires a restart while
you are in the process of doing important work. You can postpone that
restart easily without any disruptions. Also a great feature to Windows
Update is the way it handles updates for already running programs. If
Windows Update has an update that needs to be installed on an already
running program or service, Windows will safely stop the program or
service, install the update, and then restart it. This doesn’t apply to
every program, such as Microsoft Office applications or games, but it
does cover antivirus software running continuously in the background and
similar programs.
Windows Automatic Updates
Windows users all know how important critical
updates are to a system. Windows Update downloads and installs updates
automatically by default, guaranteeing your computer acquires all the
newest important updates. The tool runs at a scheduled time daily,
although you can change the setting to check once a week (which isn’t
recommended). Windows Update’s default setting is to install important
(critical and highest-priority) updates first, and then recommended
updates. The tool lets you choose whether to install other updates that
pertain to your computer but are optional, such as a driver update for
your network adapter.
Note
The Windows Update
technology is robust. Among other things, system administrators can use
it to control updating many machines across a network. |
Upon installing Windows 7, Windows Update is configured to check
for updates daily at 3:00 a.m. If you open the Windows Update tool and
click Change Settings in the Tasks list, you’ll see a prominent green
shield icon with a check mark alongside a menu item recommending you
leave automatic updates turned on (the default). Selecting Never Check
for Updates (Not Recommended) from the drop-down list displays a red
shield with an X in the middle.
Note
In Windows 7, you must be
logged on as an Administrator, or provide an Administrator password in
the User Account Control (UAC) dialog box that appears, to install
components or modify Windows Update automatic settings. |
With automatic updates enabled, information
about your computer will be uploaded to the Microsoft Windows Update
Database. Then security patches, critical updates, office updates,
drivers, and operating system service packs will be automatically
downloaded and installed to your computer. If you decide to deactivate
automatic updates, you will be bugged incessantly about it, so why fight
a good thing? We believe this is good thinking on Microsoft’s part.
Note
Windows does not use your name, address, email address, or any information that can be used to identify you or contact you. |
Allowing Windows to download and install updates
automatically keeps your system current without having to remember to
initiate an update check. It does not matter whether you have a
broadband or dial-up connection. Windows Update downloads just the files
you need, or just the parts of the files you need, thereby keeping the
downloads as small and fast moving as possible. The system is made
additionally efficient by ensuring the system downloads and installs the
most crucial updates before less-important patches. So when the next
virus outbreak hits, Windows users will immediately be protected. To
additionally make the most of your connect time, if you disconnect from
the Internet before your updates are finished, nothing is lost.
Letting Windows automatically update can
sometimes cause your computer to automatically reboot by itself—a few
important updates require a restart to successfully install. That means
if you leave Windows Update at its default settings, you could
potentially lose unsaved work. For example, say you leave your computer
to automatically update at 3:00 a.m. every day, and the previous night
you worked on important Word documents and left your computer on. While
those important documents are open on your computer (and unsaved),
Windows downloads and installs an update that requires a restart.
Windows will restart automatically, which could cause you to lose your
work. This default selection might not be the best choice for you, and
you might want to change these settings.
Caution
With Windows 7, keep in
mind that with automatic updating turned on, Windows might restart your
computer automatically after installing updates. Always save data and
close programs if this option is activated. Otherwise, change how
Windows controls automatic updates! To alleviate this type of problem Windows 7 supports hotpatching,
which enables Windows 7 to install most system updates without
rebooting. This is a welcome feature, especially if you like the
convenience of automatic updates but dislike having backups, remote
access, or other tasks disrupted by system reboots after updates are
installed. |
Be aware that it is still possible that an
update could damage your system. Windows Update creates a restore point
for your system before installing the available updates. If a problem
does occur, you can always roll back a system to its state before the
update .
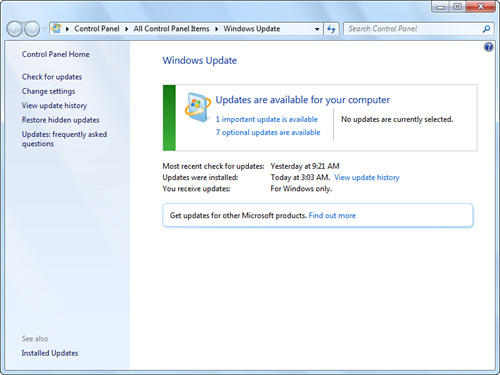
Windows Update Applet and Functions
As you can see from Figure 1,
the user has different options for updating her system. On the main
Windows Update applet, you can see the basic settings applied, the last
time the system was updated, and what kind of updates (for Windows
only). On the left side of the window is a list of options that the user
can select.
Manually Install Updates Using Windows Update
The process to manually update Windows is easy
and user friendly. By manually updating your system, you can obtain
various critical and noncritical updates. To use Windows Update
manually, follow these steps:
1. | Click Start, Control Panel, System and Security, Windows Update.
Tip Another way of getting to the Windows Update page is to click Start, All Programs, Windows Update. |
|
2. | In the Windows Update window, click Check for Updates in the Tasks list. Windows Update will then look for all possible updates.
|
3. | After
a list of updates appears, you can select and install the updates you
want. If you don’t install Important updates at this time, they will be
installed during the next scheduled automatic update.
|
Manually updating your system allows you to decide which updates you want and lets you know which updates you need.
If
one or more of your Windows Updates did not install properly, or the
program failed to install and/or produces an error, check the following: Is
there enough free disk space on your computer? An update will not
install if there is insufficient free space for it to install on. Free
up space on your system and reinstall the update. Did
you accidentally cancel an update while it was installing? If the
update was not fully downloaded, run Windows Update again. If the update
was downloaded but not installed, simply go back and reinstall the
update. Was the Microsoft Software
License Terms accepted? If an error code was created about licensing,
review the error code and select Try Again. When the licensing agreement
opens it will ask you to review the license and agree to the terms. If none of the preceding solutions works, review the error code that was created and search online for more help.
|
|
Other Windows Update Settings
You can also hide an update if you do not want
to install it. If Windows consistently asks you to install an update and
you have no desire to, just hide the update. To hide an update,
right-click the update you want to hide and select Hide Update from the
shortcut menu. Hiding an update is helpful because you essentially
filter the list to display only those updates you’re interested in. If
you want to see hidden updates again, click Restore Hidden Update in the
Tasks list of the Windows Update applet. To install an update, it must
not be hidden. If an update is hidden and you do want to install it,
restore the update first and then install.
You
occasionally won’t be able to locate an update you unhid. The likely
cause is that a newer update that addressed that problem has already
been installed. Windows 7 will check whether a newer update has already
been installed before it will allow you to install the older update. |
|
Also,
after every update, you can view the installed updates by clicking View
Update History, which visually shows you all updates that were
installed (or attempted), whether the update installation was
successful, the priority of the update, and the date of installation.
Windows Update also allows you to change certain
settings pertaining to updating. By clicking Change Settings, you will
see options for Windows automatic updating, recommended updates, and
which users can install them (see Figure 2).
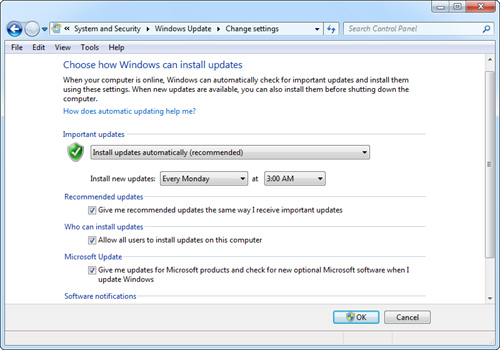
The Important Updates section offers four
drop-down menu items that affect automatic updates. The default setting
is to install updates automatically at a set time. You may change this
setting if you want to (1) choose which updates to install or (2) choose
the updates before downloading. The ability to selectively install
updates is valuable. Without choosing one of these options, Windows may
automatically restart your system, in which case open or unsaved files
could be damaged or lost. If you’re the type of user who always reads
and responds to system messages, consider changing to one of these
settings—automatic updates are important to your system, but you do not
want them to ruin your important work. The last option, Never Check for
Updates, is strongly discouraged by Microsoft.
When would you use the fourth option, to turn
off updates altogether? In general, we’d rule that out as an intelligent
option, with two exceptions:
If you have a computer that is almost
always off the Internet or a LAN, is “mission critical” (has to be up
and running), and rarely if ever has new software (including email)
added to it, this is a potential candidate. When we get such a dedicated
system running, we don’t have much interest in tempting fate with
software or system upgrades.
If you’re running and maintaining PCs in a corporate setting. These PCs are connected to the Internet and probably on a corporate network. You want to rigorously test updates before you install
them across the corporation’s PCs because Microsoft patches and updates
can sometimes break your applications’ features in subtle ways.
Note
All updates that pertain to maintenance and support for Microsoft products are free. |
New to Windows 7 is the Allow All Users to
Install Updates on this Computer option, which is selected by default.
Previous versions of Windows required the user to be logged on as
Administrator to manually install updates. This new option lets standard
users install all updates, including optional updates, without
prompting for administrative credentials. We recommend leaving this
option selected on standalone computers.
Finally, the Change Settings window also
includes a Microsoft Update check box that enables you to receive
updates for Microsoft products and check for new optional Microsoft
software when you update Windows.
Viewing and Changing Installed Updates
As stated previously, some updates can cause
system problems. By viewing which updates are installed on your computer
you can repair critical updates and remove optional updates (see Figure 3).
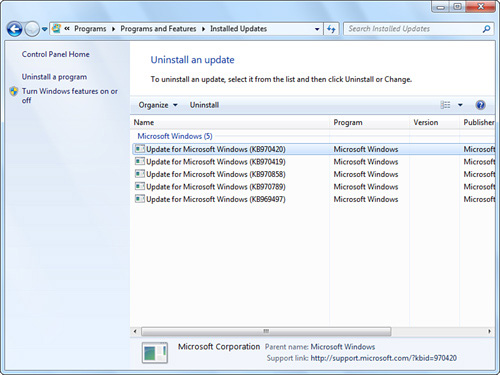
To repair or uninstall an update, follow these steps:
1. | Click Start, Control Panel, Programs, Programs and Features, View Installed Updates.
|
2. | Under Programs and Features select View Installed Updates.
|
3. | A list of all updates displays. Click the update you want to change.
|
4. | After
selecting an update, you will see various details in the middle of the
window. Also, on the top toolbar there will be an option to uninstall
(see Figure 3). Uninstalling asks for an administrative confirmation before uninstalling.
|
If
your current update is not uninstalling or Windows 7 reports that the
update cannot be uninstalled or produces an error upon uninstalling, the
problem might be that Microsoft is not allowing you remove that
particular update. If an update is an Important
update and applies to the security of the OS, you cannot install it.
Otherwise, if you’re on a network, make sure your computer is actually
connected to the network. Uninstalling an update requires your computer
to be connected to a network due to the Group Policy. Group Policy is a
network administrative tool that will manage all settings for users and
other computers. If an update that you uninstalled
keeps automatically installing on your computer, then the automatic
updating feature in Windows could be the culprit. If you have Windows
Update set to update automatically, you may experience this problem. To
solve it, you do not have to shut off or change the setting to automatic
updating. Instead of disabling features, uninstall the update, click
Check for Updates, and then click the appropriate Updates are Available
link. This will display a list of updates you may install and the update
that keeps automatically installing. For the update you do not want
installed, simply right-click the update and select Hide Update. |